Tuesday, February 19, 2013
C6 Kansas City Continued
Well, I did not forget as much as I thought. I am getting back in the swing of it (no pun intended) since returning from my business trip. I got my amp into the shop and did some practice in on both the guitar and the violin. My practice on the guitar focused more on palm harmonics than anything else. I am still struggling finding the sweet spot but am getting closer. I am doing a rake of strings 8 through 2 for the harmonic and still get a lot of "thunk" instead of the harmonic. I will hit it again after my lesson tonight. I will be danged if I am going to not get this! Not much else to report right now except I did make progress learning tabledit which I will do a separate post for and tag a label so it shows up in my learning tab.
Sunday, February 17, 2013
Lubricating The Steel Guitar
This post is for those of you who bought a used steel guitar and the owners manual is missing. I recommend following the manuafacturers recommendations. Let me know if this post is useful or if any information is missing.
Steel Guitar Setup
I apologize for a long time since my last post as I have been out of town on business. I decided for this post I would go back to some basics starting out with how to set up one of these beasts. I will follow on with a post of how to lubricate a steel guitar. I will get back to posting on my learning after I go to my first lesson since getting back. I need to figure out how much I have forgotten!
If you are like me when you get your first Steel Guitar you are struck with how heavy these things are in the case. They are no regular guitar. These things weigh between 40 and 50 pounds by themselves and upwards of 80 pounds in the case. So, you lay the case on the floor and open the case up and the guitar is face down in the case with all the push pull rods facing you. Now what? How do I get this out of the case without killing myself or damaging the guitar? It is a simple process and seems scary at first but it will become "old hat" to you very quickly. I recommend if you have the instructions that came with your guitar follow them. The process I describe here is for those who do not have the instructions for whatever the reason. Also have someone there just in case you lose control of the guitar. Later when I get my video camera, I will post a video of this process so you can see it in action.
Note:
I use a tube amp and I turn it on to warm it up while I am setting up.
Take the leg bag out and lay it next to you. Pull the legs out of the bag and lay them side by side with the rubber feet all at the same end. Notice, that two of the legs may be longer than the other two. These legs will be inserted in the holes closest to the hinge of your case or at the front of the guitar where the pedal bar is attached. The legs of my guitar are equal length. Next take out the pedal rods out of the bag and place them aside for now.
Take the longer legs or the legs with the pedal bar attachments and screw them into the appropriate holes. On some guitars like the ZB will have holes drilled through the legs where the pedal bar is attached.
NEVER ADJUST THE LEGS AFTER YOU GET THE GUITAR OUT OF THE CASE! ADJUST LEG HEIGHT BEFORE YOU ATTACH THE LEGS TO THE GUITAR
Take your pedal bar and attach it to the legs you just secured. With the pedal bar the first pedal will line up under the tuning head. Another way to tell is under the changer there will be a series of springs and this is the opposite end from the tuning head. Some pedal bars will have studs that feed through holes and then wing nuts tighten to secure the pedal bar in place. Others like my guitar have a flat bar that slides over the leg and a wing nut to tighten in place. Until you tighten the wing nuts keep one hand on the pedal bar in case the pedal bar slips. You do not want the pedal bar to come crashing down on the guitar. I have seen experienced players do this only to see excruciating pain on their faces.
Your pull rods will have on one end a hook that attaches to the guitar side of your guitar and the other end attaches to the ball joint attached to the pedal. Each pull rod is numbered starting at 1 through as many rods as you have. The pedals are numbered 1 to however many pedals you have from left to right. The reason the rods are numbered is that you can adjust the length of the pull rod so a pedal may be higher or lower than an adjacent pedal. Some are stamped on the nut while others are stamped at the end of the pedal attachment point. The number 1 rod attaches to the first pedal closest to the tuning head. Attach the guitar side hook first then attach to the pedal. Repeat this process for each rod you have. Double check the legs are securely in place, the pedal bar is secure and the rods are properly in place.
You are now ready to remove the guitar from the case. As you are facing the guitar case the hinged side will be furtherest away from you. Place the side of your left foot against the left corner of the guitar case. This prevents the case from moving on you as you remove the guitar. take your left hand and grab the leg furtherest away from you at the top of the leg near where you screwed the leg into place. When you grab the leg your thumb should point up toward the ceiling. Next grab the leg on the right side closest to you. Your thumb should point down. In one motion you are going to lift straight up and into a standing position. Be sure to lift straight up clearing the case first. If you hear a string ring out then you did not lift straight up. If you do not lift straight up, you could knock yourself out of balance or pull a string out of tune. Once you are standing up with the guitar in hand step back away from your case and rotate the guitar 180 degrees with the rotation of the legs going away from you and set the guitar on the floor. Move your hands to the end plates of the guitar ensuring the guitar will stand on its own. You should be standing on the pedal bar side of your guitar. At this point I pull the guitar toward me letting the guitar rest against my body with two of the legs off the ground. I pull my levers into place then sit the guitar back on all fours. You are now ready to move your guitar where you want it. When moving the guitar, stand on the opposite side of the pedal bar and grab the end plates and lift the guitar and move it where you want.
Take your volume pedal and attach one cable from the output of your guitar and the other end to the input side of your volume pedal. Take the other cable and attach from the output side of your volume pedal and attach to your favorite amp.
Start playing and learning! Have fun.
Give me some feedback if this was useful or if you need more information.
If you are like me when you get your first Steel Guitar you are struck with how heavy these things are in the case. They are no regular guitar. These things weigh between 40 and 50 pounds by themselves and upwards of 80 pounds in the case. So, you lay the case on the floor and open the case up and the guitar is face down in the case with all the push pull rods facing you. Now what? How do I get this out of the case without killing myself or damaging the guitar? It is a simple process and seems scary at first but it will become "old hat" to you very quickly. I recommend if you have the instructions that came with your guitar follow them. The process I describe here is for those who do not have the instructions for whatever the reason. Also have someone there just in case you lose control of the guitar. Later when I get my video camera, I will post a video of this process so you can see it in action.
 |
| Case on floor ready to open |
 |
| Open Case |
Note:
I use a tube amp and I turn it on to warm it up while I am setting up.
1. Leg Bag
Take the leg bag out and lay it next to you. Pull the legs out of the bag and lay them side by side with the rubber feet all at the same end. Notice, that two of the legs may be longer than the other two. These legs will be inserted in the holes closest to the hinge of your case or at the front of the guitar where the pedal bar is attached. The legs of my guitar are equal length. Next take out the pedal rods out of the bag and place them aside for now.
 |
| Leg Bag |
 |
| Legs and Rods |
2. Attach the Legs
Take the longer legs or the legs with the pedal bar attachments and screw them into the appropriate holes. On some guitars like the ZB will have holes drilled through the legs where the pedal bar is attached.
NEVER ADJUST THE LEGS AFTER YOU GET THE GUITAR OUT OF THE CASE! ADJUST LEG HEIGHT BEFORE YOU ATTACH THE LEGS TO THE GUITAR
 |
| Attach these first |
3. Attach the Pedal Bar
Take your pedal bar and attach it to the legs you just secured. With the pedal bar the first pedal will line up under the tuning head. Another way to tell is under the changer there will be a series of springs and this is the opposite end from the tuning head. Some pedal bars will have studs that feed through holes and then wing nuts tighten to secure the pedal bar in place. Others like my guitar have a flat bar that slides over the leg and a wing nut to tighten in place. Until you tighten the wing nuts keep one hand on the pedal bar in case the pedal bar slips. You do not want the pedal bar to come crashing down on the guitar. I have seen experienced players do this only to see excruciating pain on their faces.
 |
| Add Pedal Bar Note 1st pedal on right |
 |
| Attach Remaining Legs |
4. Attach The Pull Rods
Your pull rods will have on one end a hook that attaches to the guitar side of your guitar and the other end attaches to the ball joint attached to the pedal. Each pull rod is numbered starting at 1 through as many rods as you have. The pedals are numbered 1 to however many pedals you have from left to right. The reason the rods are numbered is that you can adjust the length of the pull rod so a pedal may be higher or lower than an adjacent pedal. Some are stamped on the nut while others are stamped at the end of the pedal attachment point. The number 1 rod attaches to the first pedal closest to the tuning head. Attach the guitar side hook first then attach to the pedal. Repeat this process for each rod you have. Double check the legs are securely in place, the pedal bar is secure and the rods are properly in place.
 |
| The 4th and 8th Pedal Rods |
 |
| Hook this end of the rod first |
 |
| Attach to the pedal |
 |
| Completed. Right-most pedal over tuning head |
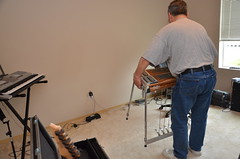
5. Remove Guitar From The Case
You are now ready to remove the guitar from the case. As you are facing the guitar case the hinged side will be furtherest away from you. Place the side of your left foot against the left corner of the guitar case. This prevents the case from moving on you as you remove the guitar. take your left hand and grab the leg furtherest away from you at the top of the leg near where you screwed the leg into place. When you grab the leg your thumb should point up toward the ceiling. Next grab the leg on the right side closest to you. Your thumb should point down. In one motion you are going to lift straight up and into a standing position. Be sure to lift straight up clearing the case first. If you hear a string ring out then you did not lift straight up. If you do not lift straight up, you could knock yourself out of balance or pull a string out of tune. Once you are standing up with the guitar in hand step back away from your case and rotate the guitar 180 degrees with the rotation of the legs going away from you and set the guitar on the floor. Move your hands to the end plates of the guitar ensuring the guitar will stand on its own. You should be standing on the pedal bar side of your guitar. At this point I pull the guitar toward me letting the guitar rest against my body with two of the legs off the ground. I pull my levers into place then sit the guitar back on all fours. You are now ready to move your guitar where you want it. When moving the guitar, stand on the opposite side of the pedal bar and grab the end plates and lift the guitar and move it where you want.
 |
| Left hand position with thumb up. Don't lift with thumb in this position. |
 |
| Left hand position ready to lift |
 |
| Right hand position. Note thumb is at bottom. |
 |
| Left foot against case |
 |
| Ready to lift straight up |
 |
| Lift straight up |
 |
| Start to rotate away from you |
 |
| Step back away from case as you rotate guitar |
 |
| Keep guitar resting against your body as you come down |
 |
| Adjust your levers into place |
 |
| Grab end plates to move around guitar |
 |
| Move into position |
 |
| Gently set into position. Ensure everything is attached before letting go |
6. Attach Cables
Take your volume pedal and attach one cable from the output of your guitar and the other end to the input side of your volume pedal. Take the other cable and attach from the output side of your volume pedal and attach to your favorite amp.
7. PLAY
Start playing and learning! Have fun.
Give me some feedback if this was useful or if you need more information.
Friday, February 8, 2013
C6 Kansas City Continued
Last night was another lesson on Kansas City on the C6 neck. As I have been telling you practice, practice, practice. I need to take my own advice. This week since last Sunday has been one of the busiest times for me both at work and at home. I have not been able to practice since Sunday, meaning only 3 hours for the week and this is Friday! When I went to my lesson last night, I was thinking, I am not going to remember anything let alone the last lesson. Boy, did I surprise myself. I left directly from work and went to my lesson. When I arrived my instructor and I chatted as I set up. Once I was set up, I did not tell my instructor right away I had not practiced. I felt like a school kid who did not do his homework! So while we were chatting I had the volume off and I went through what I thought I should know. Surprise! "I got it!" I thought. So I turned up the volume and my instructor wanted me to play so I did. I missed one little part and when my instructor told me what I did wrong, I could remember it. Now, mind you I am learning the mechanics of the song and not focusing on timing as much as I am remembering this song and looking at precision on my second octave work.
While practice is very important, I guess there is something to be said for practicing too much. Taking a break from it sometimes helps. It also contributes to forgetting so balance is in order. I am still finding this balance. As an example, when I practice, I will go over and over the same small phrase. At first obviously, I do not get it. As I practice I start getting it. After a couple of hours I start to mess up again. I then take a break and come back to it and sometimes I get it and other times I wreck. If I wreck I quit for the night and come back to it the next day. When I come back to it the next day, I can usually get it every time. I guess my brain needs time to internalize what I am trying to learn. My instructor also said something to me that some people are naturals and it comes to them easily. I have never been one of those people. All the way through school, up to my graduate degree I struggled with learning. I had to work twice as hard to get the A's and B's that came easy to others. However, the difference was that I tend to retain the information longer with a deeper understanding. IMHO this goes to the education system rewarding parroting over real learning. In school, if you can memorize then you get good grades. Yet, if you take the time to understand the fundamentals then you can extend that learning with a full understanding of the material. This is what I think is happening with my learning the steel guitar. In baby steps I am learning with better understanding of what I am doing. Not that I am gifted by any stretch of the imagination. I also think that the last three years on the E9 neck has somehow, yet not understood, led to my learning the C6 neck a little quicker. I do think that my love and passion do have influence on my learning. I also think I have a very good instructor.
Now that I am almost through the entire song, I am going to focus still on precision but emphasize the timing so it starts to sound like the song. I am looking forward to this. I think for my next post, I want to talk a little about how we can promote the steel guitar. As always I am looking for feedback, comments and suggestions. Have a good weekend everyone.
Tuesday, February 5, 2013
C6 Kansas City continued
Tonight I had another lesson. Continued with learning Kansas City and I started learning bar slanting on the C6 neck which is a little different than on the E9 neck. I am still having a little difficulty with picking patterns when they are not the standard 3-4-5, 4-5-6, 5-6-8, 6-8-10 groups even though I have been working with it for two weeks. I tried vibrato with what I have learned so far. I did not care for the sound so left it out. I played around with slides at different points and got more of a Hawaiian sound. Think I will keep it. I am liking the C6 neck a lot. Perhaps it is the time I have spent on the E9 neck as long as I have. I also spent a few minutes on the violin as well as practiced an hour when I got home from my lesson.
I have also located a 65 twin reverb in excellent condition. Not the reissue! I will be buying this one.
I have also located a 65 twin reverb in excellent condition. Not the reissue! I will be buying this one.
Monday, February 4, 2013
C6 Kansas City Continued -- Detour
Well sometimes life gets in the way. I was unable to practice Friday or Saturday, so my total hours of practice for last week was at 9. Today is a day of mixed emotions. Today is the Superbowl YAY Go 49'ers. All of my office mates are rooting for the Ravens. Today trash talk and tomorrow some will be eating crow. All in good fun. Today is also the one year anniversary of my Dad's passing. Weather is the same as it was last year -- cold and gray. Melancholy feelings are not present, I am at peace and remember the good times and good conversations he and I had. While I do miss him very much, I celebrate his life and the gifts he gave me that cannot be measured and are always deeply personal. Time to get back on track.
I am excited today as my instructor will be coming over to my house for my lesson. He has not seen my studio since I reorganized it and besides that, I bribed him with a spaghetti dinner! LOL. He is a good friend as well. Dinners are meant to be shared with family and friends.
First thing today, I had to relearn last Thursday's lesson and integrate new parts to the song. Last Thursdays lessons used some single note picking and added some string racking and slides and introduced me to the 7th pedal. Like the E9 neck where my first steps to the pedal were in Blue Hawaii and were basic, so it seems we repeat the process on the C6 neck.
Once I had this relearned we decided we needed a break. After all it is Superbowl Sunday, so we watched the game and had a good dinner. After dinner we played around with and talked about effects.
I have had a wah-wah pedal but never used it upon advice from my instructor. His idea is there is much to learn about correctly playing the steel guitar before looking at effects. Effects pedals will mask inconsistencies in your playing technique whereas perfecting technique will provide for a more effective effect when you do add them. We plugged in the wah wah pedal and he showed me how to use it on a couple of songs I have learned already. We looked online at other effects pedals and discussed their uses.
I think I have a lot more to learn before I start looking or incorporating effects.
I only got 9 hours of practice in last week and I am at a deficit this week havibng blown off Sunday.
Time to focus on practicing Monday night and get back on track.
Friday, February 1, 2013
Forming Western Washington Steel Guitar Association
If there is any one interested in trying to form a steel guitar association for western Washington in the grater puget sound information send me your contact info and lets see if we can get one going. Send me any ideas you may have. We just need to start somewhere.
Subscribe to:
Posts (Atom)