If you are like me when you get your first Steel Guitar you are struck with how heavy these things are in the case. They are no regular guitar. These things weigh between 40 and 50 pounds by themselves and upwards of 80 pounds in the case. So, you lay the case on the floor and open the case up and the guitar is face down in the case with all the push pull rods facing you. Now what? How do I get this out of the case without killing myself or damaging the guitar? It is a simple process and seems scary at first but it will become "old hat" to you very quickly. I recommend if you have the instructions that came with your guitar follow them. The process I describe here is for those who do not have the instructions for whatever the reason. Also have someone there just in case you lose control of the guitar. Later when I get my video camera, I will post a video of this process so you can see it in action.
 |
| Case on floor ready to open |
 |
| Open Case |
Note:
I use a tube amp and I turn it on to warm it up while I am setting up.
1. Leg Bag
Take the leg bag out and lay it next to you. Pull the legs out of the bag and lay them side by side with the rubber feet all at the same end. Notice, that two of the legs may be longer than the other two. These legs will be inserted in the holes closest to the hinge of your case or at the front of the guitar where the pedal bar is attached. The legs of my guitar are equal length. Next take out the pedal rods out of the bag and place them aside for now.
 |
| Leg Bag |
 |
| Legs and Rods |
2. Attach the Legs
Take the longer legs or the legs with the pedal bar attachments and screw them into the appropriate holes. On some guitars like the ZB will have holes drilled through the legs where the pedal bar is attached.
NEVER ADJUST THE LEGS AFTER YOU GET THE GUITAR OUT OF THE CASE! ADJUST LEG HEIGHT BEFORE YOU ATTACH THE LEGS TO THE GUITAR
 |
| Attach these first |
3. Attach the Pedal Bar
Take your pedal bar and attach it to the legs you just secured. With the pedal bar the first pedal will line up under the tuning head. Another way to tell is under the changer there will be a series of springs and this is the opposite end from the tuning head. Some pedal bars will have studs that feed through holes and then wing nuts tighten to secure the pedal bar in place. Others like my guitar have a flat bar that slides over the leg and a wing nut to tighten in place. Until you tighten the wing nuts keep one hand on the pedal bar in case the pedal bar slips. You do not want the pedal bar to come crashing down on the guitar. I have seen experienced players do this only to see excruciating pain on their faces.
 |
| Add Pedal Bar Note 1st pedal on right |
 |
| Attach Remaining Legs |
4. Attach The Pull Rods
Your pull rods will have on one end a hook that attaches to the guitar side of your guitar and the other end attaches to the ball joint attached to the pedal. Each pull rod is numbered starting at 1 through as many rods as you have. The pedals are numbered 1 to however many pedals you have from left to right. The reason the rods are numbered is that you can adjust the length of the pull rod so a pedal may be higher or lower than an adjacent pedal. Some are stamped on the nut while others are stamped at the end of the pedal attachment point. The number 1 rod attaches to the first pedal closest to the tuning head. Attach the guitar side hook first then attach to the pedal. Repeat this process for each rod you have. Double check the legs are securely in place, the pedal bar is secure and the rods are properly in place.
 |
| The 4th and 8th Pedal Rods |
 |
| Hook this end of the rod first |
 |
| Attach to the pedal |
 |
| Completed. Right-most pedal over tuning head |
5. Remove Guitar From The Case
You are now ready to remove the guitar from the case. As you are facing the guitar case the hinged side will be furtherest away from you. Place the side of your left foot against the left corner of the guitar case. This prevents the case from moving on you as you remove the guitar. take your left hand and grab the leg furtherest away from you at the top of the leg near where you screwed the leg into place. When you grab the leg your thumb should point up toward the ceiling. Next grab the leg on the right side closest to you. Your thumb should point down. In one motion you are going to lift straight up and into a standing position. Be sure to lift straight up clearing the case first. If you hear a string ring out then you did not lift straight up. If you do not lift straight up, you could knock yourself out of balance or pull a string out of tune. Once you are standing up with the guitar in hand step back away from your case and rotate the guitar 180 degrees with the rotation of the legs going away from you and set the guitar on the floor. Move your hands to the end plates of the guitar ensuring the guitar will stand on its own. You should be standing on the pedal bar side of your guitar. At this point I pull the guitar toward me letting the guitar rest against my body with two of the legs off the ground. I pull my levers into place then sit the guitar back on all fours. You are now ready to move your guitar where you want it. When moving the guitar, stand on the opposite side of the pedal bar and grab the end plates and lift the guitar and move it where you want.
 |
| Left hand position with thumb up. Don't lift with thumb in this position. |
 |
| Left hand position ready to lift |
 |
| Right hand position. Note thumb is at bottom. |
 |
| Left foot against case |
 |
| Ready to lift straight up |
 |
| Lift straight up |
 |
| Start to rotate away from you |
 |
| Step back away from case as you rotate guitar |
 |
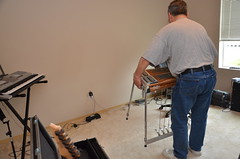
| Keep guitar resting against your body as you come down |
 |
| Adjust your levers into place |
 |
| Grab end plates to move around guitar |
 |
| Move into position |
 |
| Gently set into position. Ensure everything is attached before letting go |
6. Attach Cables
Take your volume pedal and attach one cable from the output of your guitar and the other end to the input side of your volume pedal. Take the other cable and attach from the output side of your volume pedal and attach to your favorite amp.
7. PLAY
Start playing and learning! Have fun.
Give me some feedback if this was useful or if you need more information.
Very nice post about :- Steel guitar case
ReplyDelete