From our family to you and yours we wish you a Merry Christmas. Especially during this time of year it is important to be thankful for the blessings we have been given. I am thankful for my girl friend, family and friends. I want to extend our appreciation to all members of the armed forces for they keep us free. I hope the season brings you all your wishes and desires.
If you received steel guitar related presents, congrats to you! To all of my steel guitar brothers and sisters keep picking as you don't know what lives you will touch by your music.
May the peace of our Lord Jesus Christ be with you.
Stann and Andrea
Wednesday, December 25, 2013
Saturday, September 7, 2013
C6 Journey continued -- Jerry Byrd
I have been continuing my practice with Jerry Byrd's How D'ya Do. It is slow going as this is a hard song. I have been struggling with the picking patterns. It may be in part I am still learning the C6 neck.
Music Theory Part III -- Chord Construction
In my first two posts on Music Theory I focused on Major and Minor scales and how to build them using the circle of fifths as a visual guide. In this post we will tackle building chords for major and minor scales.
Friday, July 26, 2013
How NOT to clean your Steel Guitar.
I just had to share this with you. If you have seen it before it is time to enjoy again.
www.youtube.com/watch?v=_H-I7Jv9Aww
www.youtube.com/watch?v=_H-I7Jv9Aww
Sunday, July 7, 2013
Changing Strings
I look forward to changing strings because it is a time to reflect on what progress I have made since the last time I changed strings. Also it is a time to clean and lubricate some parts on your guitar. I will detail how I change strings on my Mullen G2. The process is basically the same for other guitars but there may be some slight differences due to the different way guitars are manufactured. I also change both necks at the same time.
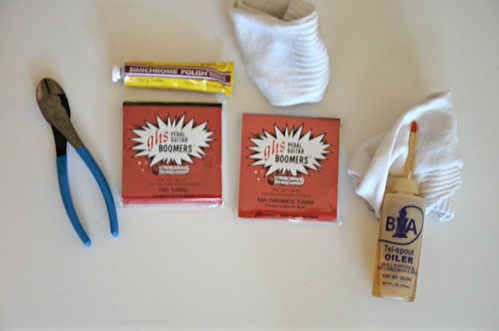
Wire Cutters
E9 Strings Use your favorite strings. I use GHS Boomers)
C6 Strings
Oil ( I use sewing machine oil. DO NOT USE WD 40 AT ALL)
Chrome polish (if needed)
Finish Polish (lacquered vs formica) Choose your poison
Rags
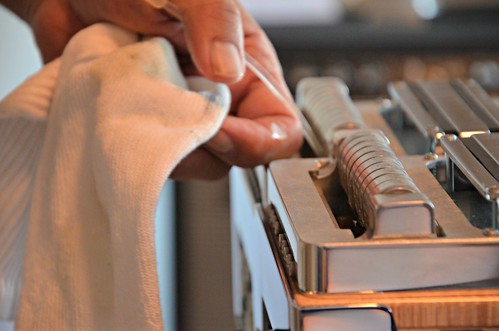
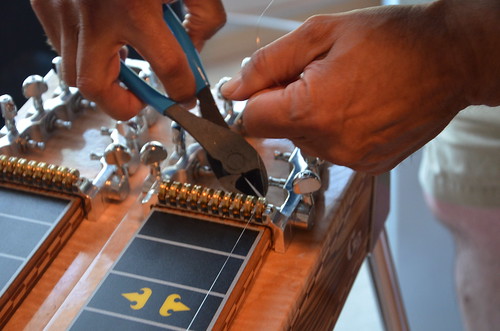
1. Removing Old Strings -- It may be fun to just cut strings and watch them fly around the room but it can also be dangerous too. Imagine hitting your girlfriend or significant other with a flying string. You might be cooking and sleeping by yourself for a while. I loosen the strings a lot. I then cut the strings one by one. If you really want to be safe grab a string with the wire cutters and before you snip the string put a heavy rag around the string and wire cutters to keep the string from flying around and/or scratching your fret board.
2. Guitar Cleaning -- Time to clean according to your manufacturers specification.
a. Take a dry, clean rag and wipe down the fret board.
b. Wipe down levers, pedals, pedal bar, legs, end plates and so on with a clean dry rag. Be careful there is no grit or dirt that would scratch surfaces.
c. Use your favorite cleaner recommended by your manufacturer to clean the formica or wood lacquered surfaces of your guitar.
d. If you have chrome surfaces, use a chrome polish and polish up those surfaces.
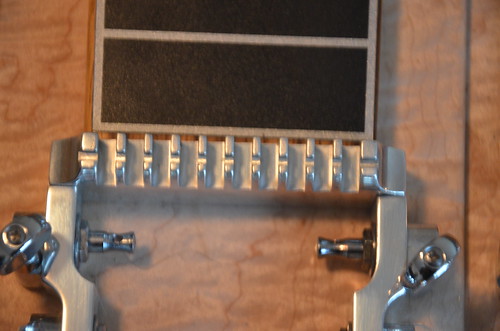
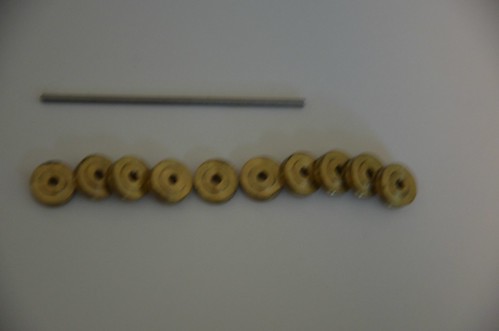
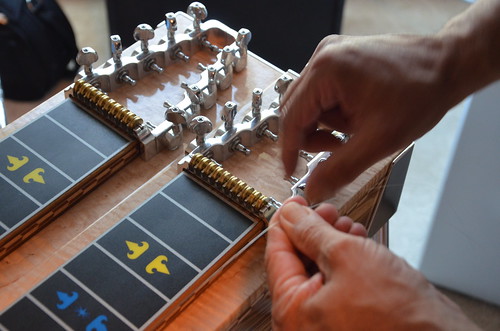
3. CLean the Nut -- No I do not mean the neighborhood nut. I mean the nut on the guitar. My roller nut comes off the guitar and I pull the rollers off and clean each one and the rod. I then put it back together and lubricate the entire assembly before placing back on the guitar.
4. Changer -- I place a drop of oil where the string connects to the changer.
5. New Strings -- I start with the E9 neck first string and work my way down. I was told when I first started to leave about 6 inches beyond the tuning head nut and cut the rest of the string away. Now my experience has not been good with that method. I was getting more slippage after I was done and my guitar would detune. Since then I leave a little more string. While it is a pain to wind on, I have stopped the slippage. I still get slippage for the first few days which is normal as the strings are stretching but I notice it is more stable quicker than before. Try it both ways and decide which you like.
Nine of the strings go one the same way and are not a problem.
The third string is a problem. I have broken third strings time and time again. This is the G# string and uses a 0.11 gauge string. If after you use the method I describe and still have difficulty then I would suggest going to a 0.12 gauge string.
Standing in front of the guitar, start with the first string and hook the one end into the changer and keep the string taut as you feed the other end through the hole in the first tuning peg. I keep about 2" of slack above the fretboard. Wind the loose end in toward you and around the string. Pull taught to the peg. Hold the slack taut and start winding pulling the string toward you to get the string to wind to the base of the peg. Continue winding until you get the string tight enough to lay across the changer and nut properly. Once you have it tight you can use the wire cutters and cut as close to the peg as you can. You do not want to leave slack that can scratch your finish.

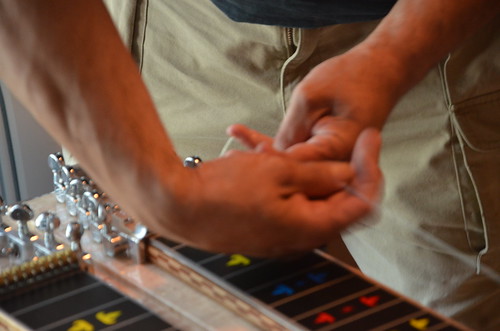
Repeat this process for strings 2,4,5,6,7,8,9, and 10. For the third string, the trick I learned was to wrap the string around itself the opposite way. Instead of wrapping the string in front of the guitar, wrap it behind the guitar and pull taut. The next thing to do with the third string is pull the string away from you and get the string to wrap toward the outer end of the peg. Don't worry you will not run out of room. Finish off the rest. The real test will be when you get ready to tune when done.
Complete this process for both necks. The third string problem is ONLY a problem for the E9 neck.
Once you are done, put away all of your supplies and discard old strings.
No you are ready to tune your guitar. If you need help tuning see Tuning A Pedal Steel Guitar
If you get it tuned without breaking the third string then your good to go.
Tips:
As always if you have questions ask me and I will find an answer if I don't know it. If you find an error or missing information let me know so I can correct it.
This is all for now. It is back to the steel and try to get down my lessons!
Supply List
Wire Cutters
E9 Strings Use your favorite strings. I use GHS Boomers)
C6 Strings
Oil ( I use sewing machine oil. DO NOT USE WD 40 AT ALL)
Chrome polish (if needed)
Finish Polish (lacquered vs formica) Choose your poison
Rags
1. Removing Old Strings -- It may be fun to just cut strings and watch them fly around the room but it can also be dangerous too. Imagine hitting your girlfriend or significant other with a flying string. You might be cooking and sleeping by yourself for a while. I loosen the strings a lot. I then cut the strings one by one. If you really want to be safe grab a string with the wire cutters and before you snip the string put a heavy rag around the string and wire cutters to keep the string from flying around and/or scratching your fret board.
2. Guitar Cleaning -- Time to clean according to your manufacturers specification.
a. Take a dry, clean rag and wipe down the fret board.
b. Wipe down levers, pedals, pedal bar, legs, end plates and so on with a clean dry rag. Be careful there is no grit or dirt that would scratch surfaces.
c. Use your favorite cleaner recommended by your manufacturer to clean the formica or wood lacquered surfaces of your guitar.
d. If you have chrome surfaces, use a chrome polish and polish up those surfaces.
3. CLean the Nut -- No I do not mean the neighborhood nut. I mean the nut on the guitar. My roller nut comes off the guitar and I pull the rollers off and clean each one and the rod. I then put it back together and lubricate the entire assembly before placing back on the guitar.
4. Changer -- I place a drop of oil where the string connects to the changer.
5. New Strings -- I start with the E9 neck first string and work my way down. I was told when I first started to leave about 6 inches beyond the tuning head nut and cut the rest of the string away. Now my experience has not been good with that method. I was getting more slippage after I was done and my guitar would detune. Since then I leave a little more string. While it is a pain to wind on, I have stopped the slippage. I still get slippage for the first few days which is normal as the strings are stretching but I notice it is more stable quicker than before. Try it both ways and decide which you like.
Nine of the strings go one the same way and are not a problem.
The third string is a problem. I have broken third strings time and time again. This is the G# string and uses a 0.11 gauge string. If after you use the method I describe and still have difficulty then I would suggest going to a 0.12 gauge string.
Standing in front of the guitar, start with the first string and hook the one end into the changer and keep the string taut as you feed the other end through the hole in the first tuning peg. I keep about 2" of slack above the fretboard. Wind the loose end in toward you and around the string. Pull taught to the peg. Hold the slack taut and start winding pulling the string toward you to get the string to wind to the base of the peg. Continue winding until you get the string tight enough to lay across the changer and nut properly. Once you have it tight you can use the wire cutters and cut as close to the peg as you can. You do not want to leave slack that can scratch your finish.
Repeat this process for strings 2,4,5,6,7,8,9, and 10. For the third string, the trick I learned was to wrap the string around itself the opposite way. Instead of wrapping the string in front of the guitar, wrap it behind the guitar and pull taut. The next thing to do with the third string is pull the string away from you and get the string to wrap toward the outer end of the peg. Don't worry you will not run out of room. Finish off the rest. The real test will be when you get ready to tune when done.
Complete this process for both necks. The third string problem is ONLY a problem for the E9 neck.
Once you are done, put away all of your supplies and discard old strings.
No you are ready to tune your guitar. If you need help tuning see Tuning A Pedal Steel Guitar
If you get it tuned without breaking the third string then your good to go.
Tips:
- After you are done playing always wipe your strings down with a dry cloth to keep grit, dirt, and salt off your strings.
- After you are done playing wipe down your finger picks and slide.
- When you change strings, write down your accomplishments since your last time changing strings. This helps you realize just exactly how much you have learned. This instrument takes a long time to learn and sometimes it feels like you are not getting anywhere. Hang in there before you know it your sounding good. You will impress yourself.
As always if you have questions ask me and I will find an answer if I don't know it. If you find an error or missing information let me know so I can correct it.
This is all for now. It is back to the steel and try to get down my lessons!
Friday, July 5, 2013
Reinforcing My Learning
Today I spent all day relearning Walking After Midnight. After I got done with How D'ya Do I forgot Walking After Midnight. With my instructors help, I learned it over again. I spent today polishing it up. At the same I was working on Kansas City also which I have regained about half of that song. I decided I do not want to relearn songs over and over again even though I know that is impossible. To assist me in my attempt I am going to change my practice sessions. After I get these songs polished, I am going to play each song I have learned at least once before going on to my current or new lesson. While I still remember Steel Guitar Rag, I will need to relearn Blue Hawaii, Sleep Walk and my other E9 songs. I am still trying to find a balance here. I am always learning new techniques and each little new technique I may be able to apply to what I have already learned. Just a little more polish. The one big thing I have learned is that when I am struggling, that is when I am breaking through ceilings. When I am not struggling is when I am starting to plateau. When I feel I am not struggling is when I pay attention to little details like precision.
Another thing I have noticed is the paring of songs my instructor has me learn. For example, pairing Walking After Midnight and Kansas City was a good way to introduce me to the C6 neck. Both songs have different picking patterns and teaches me how to switch between them naturally. With this observation, the songs I ask to learn should follow similar reasoning. I am starting to develop a song list which I will go over with my instructor to determine the best benefit increasing my skills. My interest is still learning hawaiian methods. I want to be a well rounded steel guitarist.
I have not forgotten I promised a post on changing strings. I took some pics that were slightly out of focus and I am waiting on my gf to clean up my mess! I will post soon. I also remembered a couple of things to be considered when buying a steel guitar which I will post on as well.
Keep steelin and send me comments and please follow me as I am feeling lonely and unloved. LOL.
Sunday, June 30, 2013
Milestones -- October 2012 to June 30, 2013
Tine to change strings on my guitar so it is time to reflect on what I have accomplished since the last time I changed strings.
I have learned the following songs:
By the time I got to How D'ya Do I had forgotten Kansas City and Walking After Midnight. When I told my instructor this his response was "No you did not forget them. You just forgot where you placed them. I relayed to him that we were moving too fast and needed to slow down. I feel that I need to really focus on one song until I get sick and tired of playing it and I need my instructor to remind me that I have not fully learned the song yet. We came away with this new understanding. At this point I have fully learned How D'ya Do and am continuing to practice it to polish it up. I am tired of the song but I know I am making progress. I think I have relayed before that I am harder on myself than most listeners would be. I notice every little error. To give you an idea of what this looks like for me, let me relay an incident that just recently happened.
A friend of ours was over and visiting with my girlfriend and I was upstairs practicing How D'ya Do. I would go over the introduction over and over again perfecting little things. When I was satisfied (or bored) I moved on to the first verse of the song working on little details. Some times I play the original recording, paying attention to the little details and comparing to where I am at. At one point, I played the entire song and our friend commented to my girlfriend
"Is that a recording?" knowing I was practicing and also knowing I used recordings during my practice. My girlfriend listened a moment and said
"No, thats him playing!"
"Sounds like a recording." our friend said.
After she left, my girlfriend told me that she had been busy lately and had not been paying attention to my playing and told me I had really improved a lot. Now that made me feel good at the same time I thought to myself "I have a long way to go."
There you have it, my curse I put on myself. I need to be critical but not overly critical.
I know need to go back and relearn Kansas City and Walking After Midnight and The Last Date. I figure eventually I will remember them longer than my next song. I still remember Steel Guitar Rag!
I have also learned the basics of Music Theory
I have learned some advanced techniques for the slide. Left hand techniques cannot be learned in an afternoon over a beer contrary to what you may hear from others.
I have learned some basics of Tabledit. I have not had the time to invest in in learning more.
I have learned Amazing Slow Downer and use it a lot.
I have met a couple of people who are interested in learning the pedal steel guitar and am looking forward to hearing about their progress.
Ok enough for now, if I remember anything else I have done since last October I will revise this post. I am off to change strings and I will write a post about changing strings.
I have learned the following songs:
- Kansas City (C6)
- Walking After Midnight (C6)
- How D'ya Do (C6)
- The Last Date (E9)
- Aloha Oe (E9)
By the time I got to How D'ya Do I had forgotten Kansas City and Walking After Midnight. When I told my instructor this his response was "No you did not forget them. You just forgot where you placed them. I relayed to him that we were moving too fast and needed to slow down. I feel that I need to really focus on one song until I get sick and tired of playing it and I need my instructor to remind me that I have not fully learned the song yet. We came away with this new understanding. At this point I have fully learned How D'ya Do and am continuing to practice it to polish it up. I am tired of the song but I know I am making progress. I think I have relayed before that I am harder on myself than most listeners would be. I notice every little error. To give you an idea of what this looks like for me, let me relay an incident that just recently happened.
A friend of ours was over and visiting with my girlfriend and I was upstairs practicing How D'ya Do. I would go over the introduction over and over again perfecting little things. When I was satisfied (or bored) I moved on to the first verse of the song working on little details. Some times I play the original recording, paying attention to the little details and comparing to where I am at. At one point, I played the entire song and our friend commented to my girlfriend
"Is that a recording?" knowing I was practicing and also knowing I used recordings during my practice. My girlfriend listened a moment and said
"No, thats him playing!"
"Sounds like a recording." our friend said.
After she left, my girlfriend told me that she had been busy lately and had not been paying attention to my playing and told me I had really improved a lot. Now that made me feel good at the same time I thought to myself "I have a long way to go."
There you have it, my curse I put on myself. I need to be critical but not overly critical.
I know need to go back and relearn Kansas City and Walking After Midnight and The Last Date. I figure eventually I will remember them longer than my next song. I still remember Steel Guitar Rag!
I have also learned the basics of Music Theory
I have learned some advanced techniques for the slide. Left hand techniques cannot be learned in an afternoon over a beer contrary to what you may hear from others.
I have learned some basics of Tabledit. I have not had the time to invest in in learning more.
I have learned Amazing Slow Downer and use it a lot.
I have met a couple of people who are interested in learning the pedal steel guitar and am looking forward to hearing about their progress.
Ok enough for now, if I remember anything else I have done since last October I will revise this post. I am off to change strings and I will write a post about changing strings.
Thursday, June 6, 2013
C6 Jerry Byrd - How yD'ya Do
I have been practicing after work 2 to 3 hours a day plus an hour lesson. With this schedule I have not been able to post anything till now.Well, I finally got the mechanics down of the entire song! Modified C6 tuning no pedals or levers. Now it is time to polish the song and work out all the little kinks I have in playing the song. There are some things like forward and backward raking on the same fret just picking 4 strings and I still have problems just getting the 4 strings. Sometimes I pick three other times I pick five strings. Timing is getting better. Some parts of the song change tempo. I still have to guard against rushing the song, however, I am better at keeping in the groove now than I was even 6 months ago. When I work with the slide on two strings and still need to pick the open strings adjacent to where my slide is positioned, I still some times touch the adjacent string and get that weird sound so I practice that one maneuver over and over again until I get it ( I think I do) and incorporate it back into the song. I am looking forward to the weekend so I can put all day Saturday and Sunday practicing the song. I only have one "honey-do" task on my schedule and I hope to keep it that way so I can practice. Shhh do not tell my girl friend.
I think this song has been a good one to learn and it is a pretty little tune. I have the confidence now that I really want to tackle Coconut Grove next. I may not know what I am getting myself into but I am going to try. There are a lot of forward and backward bar slants in this song. It is a cool song. Check it out. Look up Jimmy Day Coconut Grove. I love this version. This song was originally played on the lap steel and was popular in the 20's and 30's. So, the obvious question becomes "WHY? Why learn bar slants when your pedals do the same thing?" The sound is different for one. Two, I think these old techniques need to be preserved as they are part of our history. Three, it forces me to train my ear to know that my bar slant is correct. Finally I think it is fun.
Hey, I want to hear from you guys no matter where you are US, Canada, Europe or Asia. Drop a line and say howdy and tell me whats going on with your steel guitar experience. Give me permission and I will share your email in a post.
Keep Steelin
Stann
Monday, May 20, 2013
Buying a Pedal Steel Guitar II
Here is my second post on Buying A Pedal Steel Guitar. In case you missed Part I follow the link to Buying a Pedal Steel Guitar Part I In this post I cover wood choices, cabinet drop, pickups, and more.
Saturday, May 18, 2013
Tuning A Steel Guitar
How do you tune a steel guitar? Here is a little post on how I tune my guitar and train my ear at the same time. Maybe some day I will be able to tune my guitar by ear.
Wednesday, May 15, 2013
Steel Guitar Tunings - Pedal and Non Pedal
The pedal steel guitar that we know today is generally seen with two tunings E9 and C6. However, there are many different tunings that are used. Which tuning do you use? In my opinion, when starting out stick with E9 and C6. As you learn the pedal steel guitar you may wish to experiment with other tunings all dependent on your playing style. Instead of repeating what is already out there I have included a couple of links to sites that provide some very good information.
http://www.steelc6th.com/tunings.htm
http://www.hawaiiansteel.com/tunings/tunings.php
http://www.scottysmusic.com/tunings.htm
http://www.steelc6th.com/tunings.htm
http://www.hawaiiansteel.com/tunings/tunings.php
http://www.scottysmusic.com/tunings.htm
Thursday, May 9, 2013
Observations and Blog Direction
Since I started my blog I have acquired new insight as to the direction, look and feel for my blog. Some of this has been inspired by you the reader. I have included my observations and as always look forward to your feedback to make this blog better.
Thanks
Thanks
Tuesday, May 7, 2013
A Special Thanks
I think most of you will agree my photos I use are pretty darned good if I say so myself. However, I am not patting myself on the back or taking credit for these amazing photos. The credit goes to my girlfriend Andrea Ratcliff. Girl, you are amazing! Take a look at her blog for more amazing photos.
My Scrappy Goodness
My Scrappy Goodness
C6 Journey Continued -- Jerry Byrd
Well I finished Walking After Midnight and my instructor and I took a different path for my next song. We decided to tackle How D'ya Do. Jerry Byrd is known to be the Master of touch and tone and as I started learning this song it is easy to see why he is noted for this. Mess up just a little and your done. I have been at it about three weeks and I am not half way through this song. Part of this is that my practice time has reduced to 5 to 10 hours per week due to just life stuff. As I write this post, my amp is warming up to practice today's lesson. I will keep you posted on my progress.
Monday, May 6, 2013
Steel Guitar Seats -- Followup
This my follow up post on steel guitar seats. I received my ne seat and share some pics and a description.
Let me know what you think.
Let me know what you think.
Tuesday, April 30, 2013
Music Theory Part II -- Minor Scales
Send me feedback, suggestions, questions or corrections to what I present.
Monday, April 29, 2013
E9/C6 Tuning Copedants (Pedal/Knee Lever) Arrangement
I have been seeing requests for the tuning and copedant arrangement for both the E9 neck and the C6 neck. While I described these in Description of a steel guitar, I thought I would break them out separately.
For those of you interested in the Universal tuning E9/B6 I will refer you to the Pedal Steel Pages
For those of you interested in the Universal tuning E9/B6 I will refer you to the Pedal Steel Pages
E9
String Pitch A B C LKL LKV LKR RKL RKR
1 F# G#
2 D# E D
3 G# A
4 E F# F D#
5 B C# C# A#
6 G# A F#
7 F#
8 E F D#
9 D C#
10 B C# A#
C6
String Pitch P4 P5 P6 P7 P8 LKL LKR RKL RKR
1 G G#
2 E F
3 C D B C#
4 A B B G# A#
5 G F#
6 E D#
7 C C#
8 A B
9 F F# E
10 C D A
Sunday, April 28, 2013
Music Theory Part I -- The Major Scales
This is my first of several posts on music theory. I start with major scales and a detailed explanation of how to find and build each major scale.
As always send me feedback on this or any post.
As always send me feedback on this or any post.
Saturday, April 13, 2013
Steel Guitar Seats
One of the accessories your going to need to get at some point is a steel guitar seat. They come in many sizes, options and with many color and fabric selection to suit your taste. They can be pricey at $250 or so depending on what you want.
My first seat when I was a kid playing the lap steel was the kitchen table chair. Not the best but it worked and as a kid I did not know any better. When I bought my first steel guitar I opted for a cheap solution until I could figure out what I wanted. I bought a folding bench for about $80.
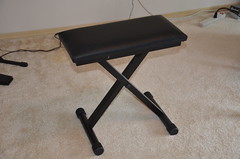
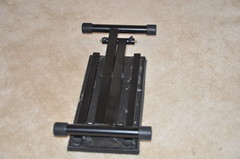
It had various height adjustments and it folded down for easy storage. It is a workable solution. One day, one of the pins holding the bench in place broke and forced me to look for a seat. I remembered Joe Naylor from Steel Guitar Seat having met him at the Dallas show. I looked him up online and I selected a monster of a seat side car, seat back and power strip. That added weight is not much but with a 78 pound guitar and a 60 pound amp the 40 pounds of a seat is a bit much. Love the seat and keep it in my studio. I ordered a second seat from Joe that is just a basic seat for lugging around. I have not received it yet and am looking forward to its arrival.

You can get what you need that will suit your purposes. Now Joe is not the only supplier of steal seats but I like Joe, he is personable and will bend over backwards to help you.
The link to Joe's site is steelseat.com
My first seat when I was a kid playing the lap steel was the kitchen table chair. Not the best but it worked and as a kid I did not know any better. When I bought my first steel guitar I opted for a cheap solution until I could figure out what I wanted. I bought a folding bench for about $80.
It had various height adjustments and it folded down for easy storage. It is a workable solution. One day, one of the pins holding the bench in place broke and forced me to look for a seat. I remembered Joe Naylor from Steel Guitar Seat having met him at the Dallas show. I looked him up online and I selected a monster of a seat side car, seat back and power strip. That added weight is not much but with a 78 pound guitar and a 60 pound amp the 40 pounds of a seat is a bit much. Love the seat and keep it in my studio. I ordered a second seat from Joe that is just a basic seat for lugging around. I have not received it yet and am looking forward to its arrival.
You can get what you need that will suit your purposes. Now Joe is not the only supplier of steal seats but I like Joe, he is personable and will bend over backwards to help you.
The link to Joe's site is steelseat.com
C6 Kansas City Continued
Now this is the last post I was working on before I went missing for a month. I debated on whether I would delete it or not and decided not to delete rather post it. It shows some of the lapses in memory as when I came back to the guitar what I was working on. I guess I should read my own posts/journals so I pick up where I left off. Lesson learned.
Ok, I went to my lesson last night and my instructor and I had a conversation about forgetting songs. He told me that playing on the E9 neck will get boring after a while to which I cannot agree or disagree since it is the only neck I have played on till I started on Kansas City on the C6 neck. I can say that what I have learned and what I hear on the C6 neck is awesome. The next point my instructor made with me is that forgetting songs is not a bad thing as we will come back to them later and re-learn the songs I forget. Now, this I have experienced first hand as I have posted on this before. I have noticed when I forget a song and come back to it later and re-learn it, I play the song much better than I did before. I think it is even possible that forgetting the song and coming back to it later has made a more significant improvement than if I had not forgot the song. Perhaps it is the fact that even if I forget songs it is my technique that is improving. So, I am yielding to this concept and not worrying about remembering songs -- for now.
Now as far as this lesson is concerned, I learned more of Kansas City and also focused on what else? Exactly, palm harmonics. We moved around the fret board using palm harmonics slides and volume swells. We also worked on some reverse rolls as well. Forward rolls I have down, however, reverse rolls are not as good as I want and I have to admit I do not practice reverse rolls as much. That will need to change and I need to start including them in my practice routine.
Friday, April 12, 2013
Tabledit
Ok, ok, I know I promised more on Tabledit and I have finally some of my experiences to share.
I am one of those men that never asks for directions when lost nor do I read instruction manuals until I get frustrated. So is the way with Tabledit. I finally got frustrated enough I started looking at the manual and was able to find what I was looking for. Surprise! Right?
When you first launch Tabledit, it is in guitar mode so you have to change it for Pedal Steel Guitar. This is accomplished by going to The menus across the top and choose Score and then Instrument.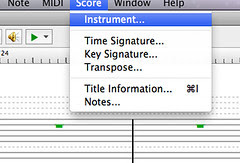
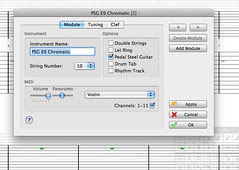
This will take you to the Instrument Dialog Box shown below. It will default to the Module tab.
Next, you will select the Tuning Tab and you will see the dialog box below. In the center you see PSG E9 Chromatic (which I already changed) with the up/down selection arrows.
Select the arrows and you can see all the instruments supported by Tabledit. For our purposes we are interested in the PSG E9 Chromatic and PSG C6. Select the PSG E9 chromatic and select ok.
Now you can look at the main window on the left side you will see all 10 strings with the pitch for each string listed. Pretty cool.
Now when I enter the first few notes of Steel Guitar Rag with hammer on and slides, tabledit inserts the notes in the Treble Clef for me! The result is below albeit not exactly correct yet, but you get the idea.
Another thing I found you can do with tabledit that I have not played with yet is that you can import a MIDI file of a song and tabledit will transpose it into tablature. I will be using my Presonus Mixer/recorder to try this out in the coming weeks.
As always let me know what you think. any comments or suggestions are always welcome.
Tuesday, April 9, 2013
Thoughts On Learning The Steel Guitar Part II
In this post I would like to discuss both student responsibilities as well as Instructor responsibilities. Of course, as always this my opinion and solely based on my short time learning the steel since 2009.
Student Responsibility
Most of us learning or wanting to learn the steel guitar either work full time or are students. Unless you are independently wealthy, you need to be able to afford the initial investment required.
As it has been said many times before, regardless of what you learn or study you must set aside time dedicated to your effort. When I was a youngster learning the lap steel, our instructor wanted us to practice 30 minutes a day. His belief was that there was a diminished return on practicing longer. For beginning students especially younger students this is true as they become more easily discouraged because they do not see the immediate benefit of longer practice sessions. Also younger students learn more quickly than their adult counterparts. However, adult students do understand the benefit of longer practice sessions. As adults we have learned about delayed gratification, improved skill by repetition, and patience through life's lessons. Understand your daily life responsibilities, your drive and passion and schedule practice time daily. I would recommend at least one hour a day. Sometimes when I get home after work, I just do not want to practice. Yet I drag my sorry self to my guitar and practice. What I find is that I get in the groove and practicing energizes me. Also the opposite can be true, especially when I have been practicing long sessions over a long period of time. In this case, I either cannot get in the groove or I just cannot get it right. Time for a break! My point is there is nothing wrong with taking a break; just make sure your motivation for not practicing is not laziness.
During your practice sessions start out with picking exercises. An example would be 6th string with thumb, 5th string with 1st finger and 4th string with middle finger blocking each string after picking. Do not worry about speed, rather concern yourself with accuracy an precision. In time speed will come with the accuracy needed. Do this for 5 or 10 minutes and move on to another technique like rolls or harmonics. If you are learning a song then practice the song you are learning. If you get bored or need a break go back to techniques. Always relax and this sounds easier than done. Remember to breathe and don't hold your breath. When I was learning a somewhat difficult picking pattern (for a beginner), my instructor was watching my attempts at mastering the technique. After several attempts he stopped me and told me to take a break. During our break we had the discussion about relaxing and breathing. When the break was over and I attempted the technique I started getting the technique.
Record your practice sessions. When you get discouraged with your progress go back and listen to your recordings when you first started learning. You will be amazed at your progress. This a great confidence builder. Let me share a personal experience with you. The first song I learned was steel Guitar Rag. After I had learned the song, I recorded myself on my cassette recorder. Moving forward over a year, I was organizing my tapes and came upon this recording which I had forgotten about. I chuckled to myself and thought I would play the recording. When I hit the play button I was horrified at what I heard. It was not a song I was hearing! It was a stream of notes being fired off like a machine gun. There was no timing, no rhythm. It was awful. I then realized how far I had come and how far I had to go. I went back to my instructor and explained my discovery and apologized to him for the offense to his ears. My instructor patiently worked with me to get the timing and phrasing of the song down. This single incident changed the approach to learning for me.
When you are not at your guitar you can still practice. First, listen to steel guitar music. In the beginning you will think "I wish I could be good enough to play like that." After a while, you will recognize patterns and techniques and you will say to yourself "I think I can learn to play like that." Then after much practice and learning you will be playing what you thought to be impossible! Some of my favorite artists include Jerry Byrd, Jimmy Day, Lloyd Greem, and Speedy West all of which I have their albums on my iPod. Other albums I listen to include a CMH album Totally Hot Nashville which includes some TV theme songs, La Bamba and others. Another CMH album I like is A Tribute To The Eagles.
Also search Youtube and other sources on the internet for songs, techniques and such that interest you. Bring them to your instructor and he/she may be able to work them in your lessons in a way that benefits you for your skill at the time.
One of the other things I did was to practice forward and backward rolls on a table top. This drove my girlfriend nuts when we are at a restaurant and I am thumping on the table.
In short:
Practice daily
Set a schedule
Practice techniques daily
Record yourself
Breathe
Relax
Listen to Steel Guitar music
Be critical of yourself but do not be harsh. We are our own worst critic.
As always I am open to feed back and your own experiences and advice learning the steel guitar.
Sunday, April 7, 2013
Right Hand Techniques
In this post I wanted to cover some of the basic right hand technique. This post is directed at the beginner. Once I get my video set up I will add some video clips of these where appropriate.
Attack
One of the tendencies when you first start playing is to attack the strings to hard. I guess for me it was a way I tried to compensate for not getting sustain. In fact, attacking the strings too hard does the opposite and does not give you the tone you are looking for. Be kind to your strings and less attack. Let the natural tone of the guitar work for you.
One of the first techniques I learned was palm blocking. Were going to use strings 4-5-6 on the E9 neck. keep your right edge of your picking hand on the pickups. Place your thumb pick against the 6th string, first finger pick against the 5th string and your middle finger against the 4th string. Now pick the 6th string and then block the string using the right edge of your picking hand and block the string. Pick the 5th string and block. Pick the 4th string and block. Do this slowly as this is not a race but you are training the muscle memory of your fingers. Speed will come in time. Spend about 5 to 10 minutes a day practicing this. Any more and you will die from boredom.


The major triads are picking groups of strings together. The major triads are 3rd, 4th, and 5th strings usually represented as 3-4-5. There are also 4-5-6, 5-6-8, 6-8-10. These will not be the only groups you will use, however, they are the most frequent. I would suggest practicing each of these groups and work your way up playing 6-8-10, 5-6-8, 4-5-6, and 3-4-5. Then repeat the other direction. Soon your fingers will find the groups automatically. Once you get this down try rolling the groups especially 5-6-8 and 6-8-10.
This is not the time to worry about speed picking. As you do the exercises above you will find it difficult enough to do slowly. What you want is consistent precision. To get this it requires building muscle memory. This happens over time and as you practice over and over and over, you will develop speed.
Attack
One of the tendencies when you first start playing is to attack the strings to hard. I guess for me it was a way I tried to compensate for not getting sustain. In fact, attacking the strings too hard does the opposite and does not give you the tone you are looking for. Be kind to your strings and less attack. Let the natural tone of the guitar work for you.
Palm Blocking
One of the first techniques I learned was palm blocking. Were going to use strings 4-5-6 on the E9 neck. keep your right edge of your picking hand on the pickups. Place your thumb pick against the 6th string, first finger pick against the 5th string and your middle finger against the 4th string. Now pick the 6th string and then block the string using the right edge of your picking hand and block the string. Pick the 5th string and block. Pick the 4th string and block. Do this slowly as this is not a race but you are training the muscle memory of your fingers. Speed will come in time. Spend about 5 to 10 minutes a day practicing this. Any more and you will die from boredom.
Finger Blocking
Finger blocking is when you pick a string and then place your picking finger against the string to block the tone. It has a different sound than palm blocking. Move back and forth between palm blocking and finger blocking.Hammer On/Off
Hammer On and Hammer Off are easy techniques to learn. With your first finger pick the open 4th string. As the string rings out place the tone bar on the 2nd fret. Hammer off is the opposite maneuver. With the bar on the 2nd fret, pick the 4th string and as the string rings remove the bar from the 2nd fret. You have just learned what you need for Steel Guitar Rag!Roll
A roll sounds like a strum. Using strings 4-5-6 where thumb on 6th string, first finger on 5th string, and middle finger on the 4th string. Now pick 6, 5, and 4 in that order letting each string ring out. It should sound like a strum with even intervals between the picking of each string.Raking
There is both forward raking and backward raking. Forward raking is strumming the strings from 10th string to the first string. Now you do not need to start with the 10th string. You could start from any string and stop at any string. I have raked from the 8th string to the 2nd string. In this instance I add the safety of putting my ring finger against the 1st string to prevent me from accidentally striking the first string. The reverse rake is exactly the opposite of the forward rake. While I have not used the reverse rake, I have seen my instructor use it.Finger Harmonics
Some people find harmonics easy and others find it difficult. I have a more difficult time with palm harmonics than I do with finger harmonics. This is a re-post from My Journey Part I.
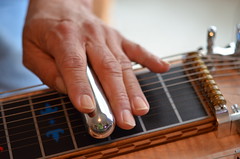
1. Place your tone bar on a fret. For our purposes lets use the 3rd fret.
2. Now you get to hold your picking hand in a weird contorted position. With your picking hand in front of you, hold your thumb in the 9 o'clock position with your forearm at a 30 degree (approximately) to your body. Your ring finger will be at the 9 o'clock position. Your middle finger will be pointing straight back at your body. The proper position will have the middle finger parallel the fret markers.
3. With tone bar at the 3rd fret, we need to pick one octave up at the 15th fret. Pick the 4th string with thumb and middle finger at the same time. The image below shows me at the 17th fret.
Do not be surprised if you get a "thunk" sound the first few times you do this. What you will need to do is ensure your tone bar is properly placed. Just because you are exactly on the 3rd fret does not ensure a harmonic. If you are tuned slightly flat or sharp you will need to adjust your placement of the tone bar. Also, in conjunction with tone bar placement, you may pick slightly flat or sharp around the 15th fret to find the "sweet spot" of your guitar. Some guitars are more forgiving than others.
Tip:
After you get the basic technique down for harmonics, here is an exercise that helped me. Place your tone bar at the 5th fret. Pick your harmonics at the 15th fret, picking all ten strings. I start at the 10th string and work my way up to the 1st string and then back down. Now, leaving your tone bar at the 5th fret, move down to the 12th fret and pick the harmonic there repeating the 10 string process. Do you notice it is a little harder to hit the harmonic? Once you get this down, repeat the process leaving the tone bar at the 5th fret and move your picking hand to the 10th fret and pick all ten strings up and down. Finally, leaving the tone bar at the 5th fret, move your picking hand to the 8th fret and pick the harmonic on all 10 strings up and back down. I promise you that there is a harmonic at each of these positions. What this exercise will do for you is improve your precision. It is very difficult to get the harmonic at the 8th fret. Once you get it down, then your harmonic at the 15th fret will be almost effortless. This is what I mean by paying attention to details. This will take hours upon hours of practice. I do not know why, I picked this harmonics up pretty quickly. Maybe you will and maybe you will struggle with it. If you do this exercise, I would like to hear from you on your success or frustration with it.
Once I had the harmonics down, I learned the entire song sleepwalk using the harmonic pick and slide. Maintaining sustain during a slide with a harmonic is difficult in my opinion. At first it was dying before I could complete my slide. Again, I practiced this one move hour upon hour until I started getting it. To this day two years later, I still practice harmonics daily.
Palm Harmonics
With Palm Harmonics you are doing the same thing with the right edge of your picking hand that the finger does for you in finger harmonics. In my opinion it is more difficult to find the "sweet spot" with palm harmonics because it is harder to judge where your palm is on the fret board than it is with finger harmonics. I still practice it and I will get better. By the way, I use this method when I am raking strings. If I am picking one or two strings I use finger harmonics.Major Triads
The major triads are picking groups of strings together. The major triads are 3rd, 4th, and 5th strings usually represented as 3-4-5. There are also 4-5-6, 5-6-8, 6-8-10. These will not be the only groups you will use, however, they are the most frequent. I would suggest practicing each of these groups and work your way up playing 6-8-10, 5-6-8, 4-5-6, and 3-4-5. Then repeat the other direction. Soon your fingers will find the groups automatically. Once you get this down try rolling the groups especially 5-6-8 and 6-8-10.
Speed Picking
This is not the time to worry about speed picking. As you do the exercises above you will find it difficult enough to do slowly. What you want is consistent precision. To get this it requires building muscle memory. This happens over time and as you practice over and over and over, you will develop speed.
Saturday, April 6, 2013
Selecting Bars and Picks
In this post I want to talk about bars and picks. Lets start with bars. I use bar, slide and tone bar interchangeably. The bar needs to be long enough to accommodate your 6,8, 10, or 12 string guitar. The next thing to consider is the material of the bar. There are bars with composite coatings and others from stainless steel. I have used both and I prefer the stainless steel variety. The next thing to consider is the diameter of the bar. Bars come in 7/8", 15/16", and 1" diameters. The larger diameter bars will sustain better and the heavier the bar helps sustain. The smaller diameter bars are easier to be precise with. I have been using a 7/8" bar and I am going to switch to a 15/16" bar.
Picks
I use National thumb picks as they are more comfortable on my thumb than others. Look around and pick what feels like a good fit for you. I paid particular attention to the blade of the pick. Some were too wide or had unusual shapes for which I could not appreciate how I felt I had to position my right hand. Other people may have more specific reasons for picking one thumb pick over another and I would love to hear those opinions and share them. Who knows I may change my opinion.
With the finger picks there are two things to consider. First, the thickness of the material. I use a Dunlop 0.13 thick pick. It is made out of nickel and silver. Another good brand to consider is National. My very first set of finger picks were National. My reason for switching to Dunlop was laziness! The Dunlop was readily available locally. Since my initial switch, my local supplier has not kept their supplies levels upo. I may end up switching back to Nationals if I have to order them.
Wearing and molding the finger picks is something I need to share with you. You have to be careful how you mold the finger picks. When I put new picks on for the first time I slide the pic up my finger at about the mid point on the band is lined up with the bottom of the cuticle. carefully bend the pick around your finger with the pick on. Now, for the tricky part. You need a flat surface like a desk or table and NOT the top of your guitar. place your finger on the table with the base of the pick resting on the table. Now slowly roll your finger until your finger tip is vertical. This will roll the pick smoothly to your finger. You do not want any harsh bends. When you play the guitar if the band gets stuck on a string above where you want to play, you need to adjust/mold the pick closer to your finger. Also make sure that your hand is in the proper picking position.
After the last roll in the picture above you may still need to bend the pick. Place a finger along the underside of the pic and gently roll the pick toward the tip of your pick finger. When done make sure the side rings are flat against the top of your finger otherwise they will catch on strings when you play.
If you get a crease in the pick then you did not do it right.
With the pictures and the description, I hope this is clear. It is better to show someone in person. If you have difficulty or need more information send mea message.
 |
| Stainless Steel Bar 15/16" and Tribo Tone bar 7/8" |
 |
| 7/8" on Fret board - Note the amount of area compared to the 15/16" bar |
 |
| 15/16" Stainless Steel slide |
Picks
I use National thumb picks as they are more comfortable on my thumb than others. Look around and pick what feels like a good fit for you. I paid particular attention to the blade of the pick. Some were too wide or had unusual shapes for which I could not appreciate how I felt I had to position my right hand. Other people may have more specific reasons for picking one thumb pick over another and I would love to hear those opinions and share them. Who knows I may change my opinion.
With the finger picks there are two things to consider. First, the thickness of the material. I use a Dunlop 0.13 thick pick. It is made out of nickel and silver. Another good brand to consider is National. My very first set of finger picks were National. My reason for switching to Dunlop was laziness! The Dunlop was readily available locally. Since my initial switch, my local supplier has not kept their supplies levels upo. I may end up switching back to Nationals if I have to order them.
 |
| Steel guitar Picks |
Wearing and molding the finger picks is something I need to share with you. You have to be careful how you mold the finger picks. When I put new picks on for the first time I slide the pic up my finger at about the mid point on the band is lined up with the bottom of the cuticle. carefully bend the pick around your finger with the pick on. Now, for the tricky part. You need a flat surface like a desk or table and NOT the top of your guitar. place your finger on the table with the base of the pick resting on the table. Now slowly roll your finger until your finger tip is vertical. This will roll the pick smoothly to your finger. You do not want any harsh bends. When you play the guitar if the band gets stuck on a string above where you want to play, you need to adjust/mold the pick closer to your finger. Also make sure that your hand is in the proper picking position.
 |
| Initial position on the finger |
 |
| Ready to mold the pick |
 |
| Start rolling your finger |
 |
| Continue rolling your finger |
 |
| Almost done! |
After the last roll in the picture above you may still need to bend the pick. Place a finger along the underside of the pic and gently roll the pick toward the tip of your pick finger. When done make sure the side rings are flat against the top of your finger otherwise they will catch on strings when you play.
If you get a crease in the pick then you did not do it right.
With the pictures and the description, I hope this is clear. It is better to show someone in person. If you have difficulty or need more information send mea message.
Tuesday, April 2, 2013
My Journey Countinuing April 2013
Now that I am taking lessons 6 days a week my schedule is full! I have finished learning Walking After Midnight and have returned to Kansas City believing I had forgotten the song. To my surprise, while I had forgotten the song, when y instructor gave me the first couple of chords I remembered a few bars which in turn jarred my memory for a few more bars. I then took a break and went back and played Walking After Midnight from start to finish. I then went back to Kansas City and played what I remembered of the song. In my opinion my taking lessons 6 days a week is helping greatly. My instructor is taking the approach of teaching me songs that teach me the techniques I need for the C6 neck. Also, he is taking one lesson per week to focus strictly on technique. For now he is having me focus on precision. I am learning how to move between first and second octave quickly and be spot on the fret. At the same time I am trying to burn the pitch into my brain so I can know I am on fret by ear.
One of the problems I reported in an earlier post was my picking hand drifting south while playing. I am happy to report that I have corrected that problem! Now my right hand position is automatic and stays put even when my stress level goes up.
I am working on apostrophe about tone bars and my opinion on selecting a tone bar. I will also include a discussion on selecting picks and how to wear them.
Wednesday, March 27, 2013
The Rumors of My Demise....
Quoting from Mark Twain "The rumors of my demise have been greatly exaggerated" is true for me given my unexplained absence. Last month I was on travel status for a week. Upon returning from my business trip I had minor surgery to fix ingrown toenails that I have had since high school. Yes I know I am a procrastinator and more so I have an aversion to pain inflicted by surgery. Yet the daily pain became the driving influence to seek medical assistance. An hour after walking into the doctors office I was hobbling out. It has been four weeks and I am almost totally healed on one toe and about 80% healed on the other. During my initial recovery I could not play my steel guitar because I could not operate the pedals or the volume pedal. I could not set up or tear down my guitar. Since I have two guitars my instructor graciously let me bring one guitar to his studio and my instructor set up my guitar and allowed me too leave it in his studio. I have been back at it and have changed my schedule. It has become increasingly difficult to work all day, get home and eat dinner and practice. I decided that I would increase my lessons from 3 times a week to 6 days a week. My reason for this approach is that lessons 6 one hour lessons a week, I get more out of it than practicing 2 or 3 hours a night on my own. Now I have completed Kansas City and am now almost done with Walking After Midnight. My instructor is setting one lesson per week dedicated to precision and the other lessons to learning a song, ride, turnaround or such. He is also slowing down and including phrasing and timing with each lesson. I am also learning to train my ear. My lesson here is when I use my tuner and tune my guitar, I pick E repeatedly and burn that pitch into my mind. My instructor tells me with the knowledge of the E pitch I can tune all other strings. While I do not understand yet, I will have faith and do it.
The other issue I had at this time was my Fender twin reverb amp developed problems. I took it in and it took 3 weeks to get repaired. During the absence of my beloved tube amp, I reinforced why I hate digital amps. Thank God my baby is back.
Some housekeeping, I said in an earlier post, I had figured out how to use Tabledit and would share my new found knowledge. I have not forgotten and I will add this post later. In learning Tabledit, I have been entering Steel Guitar Rag since I know the song. This leads me to the next piece of housekeeping.
I have always wanted to share how to play the steel guitar. I have scheduled time in a couple of months to record audio and video of learning the steel guitar. The plan is to record techniques needed for the song in question. I also need a video camera to record the lessons. In my opinion a cheap video camera is not an option. When I obtain the video camera of the quality I need I will record a lessons for Steel Guitar Rag to start. Other housekeeping I need to discuss are driven by you the reader.
I always review which of my posts get the most views as well as what searches are entered by you. The majority of what I have seen centers around learning, techniques, tablature, and equipment selection. So I will include posts on these topic areas and lessons will include these topic areas. Be patient as I need to do some research to back up what I share with you.
Tuesday, February 19, 2013
C6 Kansas City Continued
Well, I did not forget as much as I thought. I am getting back in the swing of it (no pun intended) since returning from my business trip. I got my amp into the shop and did some practice in on both the guitar and the violin. My practice on the guitar focused more on palm harmonics than anything else. I am still struggling finding the sweet spot but am getting closer. I am doing a rake of strings 8 through 2 for the harmonic and still get a lot of "thunk" instead of the harmonic. I will hit it again after my lesson tonight. I will be danged if I am going to not get this! Not much else to report right now except I did make progress learning tabledit which I will do a separate post for and tag a label so it shows up in my learning tab.
Sunday, February 17, 2013
Lubricating The Steel Guitar
This post is for those of you who bought a used steel guitar and the owners manual is missing. I recommend following the manuafacturers recommendations. Let me know if this post is useful or if any information is missing.
Steel Guitar Setup
I apologize for a long time since my last post as I have been out of town on business. I decided for this post I would go back to some basics starting out with how to set up one of these beasts. I will follow on with a post of how to lubricate a steel guitar. I will get back to posting on my learning after I go to my first lesson since getting back. I need to figure out how much I have forgotten!
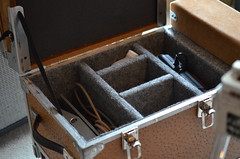
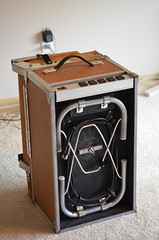
If you are like me when you get your first Steel Guitar you are struck with how heavy these things are in the case. They are no regular guitar. These things weigh between 40 and 50 pounds by themselves and upwards of 80 pounds in the case. So, you lay the case on the floor and open the case up and the guitar is face down in the case with all the push pull rods facing you. Now what? How do I get this out of the case without killing myself or damaging the guitar? It is a simple process and seems scary at first but it will become "old hat" to you very quickly. I recommend if you have the instructions that came with your guitar follow them. The process I describe here is for those who do not have the instructions for whatever the reason. Also have someone there just in case you lose control of the guitar. Later when I get my video camera, I will post a video of this process so you can see it in action.
Note:
I use a tube amp and I turn it on to warm it up while I am setting up.
Take the leg bag out and lay it next to you. Pull the legs out of the bag and lay them side by side with the rubber feet all at the same end. Notice, that two of the legs may be longer than the other two. These legs will be inserted in the holes closest to the hinge of your case or at the front of the guitar where the pedal bar is attached. The legs of my guitar are equal length. Next take out the pedal rods out of the bag and place them aside for now.
Take the longer legs or the legs with the pedal bar attachments and screw them into the appropriate holes. On some guitars like the ZB will have holes drilled through the legs where the pedal bar is attached.
NEVER ADJUST THE LEGS AFTER YOU GET THE GUITAR OUT OF THE CASE! ADJUST LEG HEIGHT BEFORE YOU ATTACH THE LEGS TO THE GUITAR
Take your pedal bar and attach it to the legs you just secured. With the pedal bar the first pedal will line up under the tuning head. Another way to tell is under the changer there will be a series of springs and this is the opposite end from the tuning head. Some pedal bars will have studs that feed through holes and then wing nuts tighten to secure the pedal bar in place. Others like my guitar have a flat bar that slides over the leg and a wing nut to tighten in place. Until you tighten the wing nuts keep one hand on the pedal bar in case the pedal bar slips. You do not want the pedal bar to come crashing down on the guitar. I have seen experienced players do this only to see excruciating pain on their faces.
Your pull rods will have on one end a hook that attaches to the guitar side of your guitar and the other end attaches to the ball joint attached to the pedal. Each pull rod is numbered starting at 1 through as many rods as you have. The pedals are numbered 1 to however many pedals you have from left to right. The reason the rods are numbered is that you can adjust the length of the pull rod so a pedal may be higher or lower than an adjacent pedal. Some are stamped on the nut while others are stamped at the end of the pedal attachment point. The number 1 rod attaches to the first pedal closest to the tuning head. Attach the guitar side hook first then attach to the pedal. Repeat this process for each rod you have. Double check the legs are securely in place, the pedal bar is secure and the rods are properly in place.
You are now ready to remove the guitar from the case. As you are facing the guitar case the hinged side will be furtherest away from you. Place the side of your left foot against the left corner of the guitar case. This prevents the case from moving on you as you remove the guitar. take your left hand and grab the leg furtherest away from you at the top of the leg near where you screwed the leg into place. When you grab the leg your thumb should point up toward the ceiling. Next grab the leg on the right side closest to you. Your thumb should point down. In one motion you are going to lift straight up and into a standing position. Be sure to lift straight up clearing the case first. If you hear a string ring out then you did not lift straight up. If you do not lift straight up, you could knock yourself out of balance or pull a string out of tune. Once you are standing up with the guitar in hand step back away from your case and rotate the guitar 180 degrees with the rotation of the legs going away from you and set the guitar on the floor. Move your hands to the end plates of the guitar ensuring the guitar will stand on its own. You should be standing on the pedal bar side of your guitar. At this point I pull the guitar toward me letting the guitar rest against my body with two of the legs off the ground. I pull my levers into place then sit the guitar back on all fours. You are now ready to move your guitar where you want it. When moving the guitar, stand on the opposite side of the pedal bar and grab the end plates and lift the guitar and move it where you want.
Take your volume pedal and attach one cable from the output of your guitar and the other end to the input side of your volume pedal. Take the other cable and attach from the output side of your volume pedal and attach to your favorite amp.
Start playing and learning! Have fun.
Give me some feedback if this was useful or if you need more information.
If you are like me when you get your first Steel Guitar you are struck with how heavy these things are in the case. They are no regular guitar. These things weigh between 40 and 50 pounds by themselves and upwards of 80 pounds in the case. So, you lay the case on the floor and open the case up and the guitar is face down in the case with all the push pull rods facing you. Now what? How do I get this out of the case without killing myself or damaging the guitar? It is a simple process and seems scary at first but it will become "old hat" to you very quickly. I recommend if you have the instructions that came with your guitar follow them. The process I describe here is for those who do not have the instructions for whatever the reason. Also have someone there just in case you lose control of the guitar. Later when I get my video camera, I will post a video of this process so you can see it in action.
 |
| Case on floor ready to open |
 |
| Open Case |
Note:
I use a tube amp and I turn it on to warm it up while I am setting up.
1. Leg Bag
Take the leg bag out and lay it next to you. Pull the legs out of the bag and lay them side by side with the rubber feet all at the same end. Notice, that two of the legs may be longer than the other two. These legs will be inserted in the holes closest to the hinge of your case or at the front of the guitar where the pedal bar is attached. The legs of my guitar are equal length. Next take out the pedal rods out of the bag and place them aside for now.
 |
| Leg Bag |
 |
| Legs and Rods |
2. Attach the Legs
Take the longer legs or the legs with the pedal bar attachments and screw them into the appropriate holes. On some guitars like the ZB will have holes drilled through the legs where the pedal bar is attached.
NEVER ADJUST THE LEGS AFTER YOU GET THE GUITAR OUT OF THE CASE! ADJUST LEG HEIGHT BEFORE YOU ATTACH THE LEGS TO THE GUITAR
 |
| Attach these first |
3. Attach the Pedal Bar
Take your pedal bar and attach it to the legs you just secured. With the pedal bar the first pedal will line up under the tuning head. Another way to tell is under the changer there will be a series of springs and this is the opposite end from the tuning head. Some pedal bars will have studs that feed through holes and then wing nuts tighten to secure the pedal bar in place. Others like my guitar have a flat bar that slides over the leg and a wing nut to tighten in place. Until you tighten the wing nuts keep one hand on the pedal bar in case the pedal bar slips. You do not want the pedal bar to come crashing down on the guitar. I have seen experienced players do this only to see excruciating pain on their faces.
 |
| Add Pedal Bar Note 1st pedal on right |
 |
| Attach Remaining Legs |
4. Attach The Pull Rods
Your pull rods will have on one end a hook that attaches to the guitar side of your guitar and the other end attaches to the ball joint attached to the pedal. Each pull rod is numbered starting at 1 through as many rods as you have. The pedals are numbered 1 to however many pedals you have from left to right. The reason the rods are numbered is that you can adjust the length of the pull rod so a pedal may be higher or lower than an adjacent pedal. Some are stamped on the nut while others are stamped at the end of the pedal attachment point. The number 1 rod attaches to the first pedal closest to the tuning head. Attach the guitar side hook first then attach to the pedal. Repeat this process for each rod you have. Double check the legs are securely in place, the pedal bar is secure and the rods are properly in place.
 |
| The 4th and 8th Pedal Rods |
 |
| Hook this end of the rod first |
 |
| Attach to the pedal |
 |
| Completed. Right-most pedal over tuning head |
5. Remove Guitar From The Case
You are now ready to remove the guitar from the case. As you are facing the guitar case the hinged side will be furtherest away from you. Place the side of your left foot against the left corner of the guitar case. This prevents the case from moving on you as you remove the guitar. take your left hand and grab the leg furtherest away from you at the top of the leg near where you screwed the leg into place. When you grab the leg your thumb should point up toward the ceiling. Next grab the leg on the right side closest to you. Your thumb should point down. In one motion you are going to lift straight up and into a standing position. Be sure to lift straight up clearing the case first. If you hear a string ring out then you did not lift straight up. If you do not lift straight up, you could knock yourself out of balance or pull a string out of tune. Once you are standing up with the guitar in hand step back away from your case and rotate the guitar 180 degrees with the rotation of the legs going away from you and set the guitar on the floor. Move your hands to the end plates of the guitar ensuring the guitar will stand on its own. You should be standing on the pedal bar side of your guitar. At this point I pull the guitar toward me letting the guitar rest against my body with two of the legs off the ground. I pull my levers into place then sit the guitar back on all fours. You are now ready to move your guitar where you want it. When moving the guitar, stand on the opposite side of the pedal bar and grab the end plates and lift the guitar and move it where you want.
 |
| Left hand position with thumb up. Don't lift with thumb in this position. |
 |
| Left hand position ready to lift |
 |
| Right hand position. Note thumb is at bottom. |
 |
| Left foot against case |
 |
| Ready to lift straight up |
 |
| Lift straight up |
 |
| Start to rotate away from you |
 |
| Step back away from case as you rotate guitar |
 |
| Keep guitar resting against your body as you come down |
 |
| Adjust your levers into place |
 |
| Grab end plates to move around guitar |
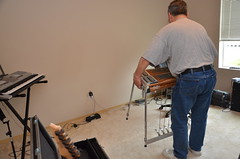 |
| Move into position |
 |
| Gently set into position. Ensure everything is attached before letting go |
6. Attach Cables
Take your volume pedal and attach one cable from the output of your guitar and the other end to the input side of your volume pedal. Take the other cable and attach from the output side of your volume pedal and attach to your favorite amp.
7. PLAY
Start playing and learning! Have fun.
Give me some feedback if this was useful or if you need more information.
Subscribe to:
Posts (Atom)